PowerShell Error Handling

I know what some of you are thinking when reading this BLOG – I do not need error handling, I only use PowerShell for one-line commands, or PowerShell is not a development language… Well, I am here to tell you… You actually do need it, and it is actually super easy to accomplish.

There are a lot of ways to actually build in error handling or checking into your PowerShell code, sometimes in ways that are not even meant to be error handling. I know when I was new to PowerShell, or writing anything for that fact, I used to do a lot of output writing to check my code. Consider the following:

$basetext = "testing"

for($i=0; $i -lt 5; $i++)
{
    $basetext = $basetext + $i
}

This is a simplistic piece of code that simply steps through a FOR statement and adds the next value of variable $i to the text string. It has no practical use really, but the traditional ways of error handling will not allow you to know if this is working the way you expected. I simply add the following line inside of the FOR statement to check if it is the proper output.

$basetext = "testing"

for($i=0; $i -lt 5; $i++)
{
    $basetext = $basetext + $i
    Write-Output $basetext
}

The Write-Output command will simply spit out the value of $basetext each time and allow me to make sure that the value I am expecting is true is accurate. Now, is this true error handling, the correct answer is no, but I wanted to share this since it is not always the procedural error handling that will assist in every situation. If the above code is executed with line 6 reading $basetext + $i then the result would not be what you are expecting, although, technically no errors would be thrown.

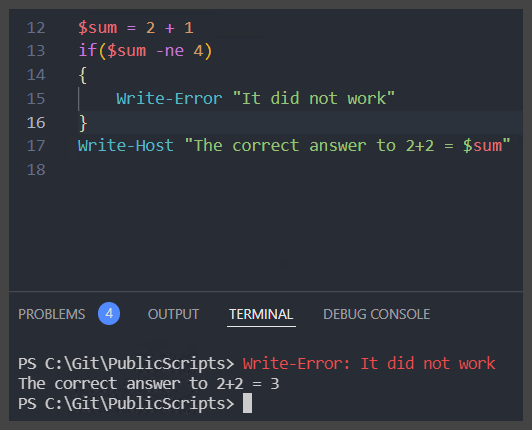
So, with that little tidbit of information out of the way, let’s look at traditional error handling with PowerShell. PowerShell has a CMDlet called Write-Error which allows you to do just that – to write an error to the output. However, this will not do exactly what you would expect it to do without some “tweaking”. Consider I write the following lines:

$sum = 2 + 1
if($sum -ne 4)
{
    Write-Error "It did not work"
}

Write-Host "The correct answer to 2+2 = $sum"

(And yes, those of you who are possibly a little more advanced will see that if I add an ELSE block here I could handle this differently – But humor me and everyone else, and just go with it 😊) Now, if you look at my sort of ridiculous but effective example – you will expect this block of code to result in a message to the user that it did not work and that would be the end of it. However, this is not true, there WILL be an error message written out to the users letting them know the calculation did not work, unfortunately, there will ALSO be a message written out to the users letting them know that 2+2 = 3 – OH NO!

Why does this happen? Because by itself, the Write-Error CMDlet does not throw a terminating error, it simply is outputting a given input as the error. However, by adding -ErrorAction Stop to this CMDlet we can then force a terminating error that will not only stop the code where we want it to stop but it can also be utilized in a Catch (Which we will get to shortly) so that the error can be dealt with. So, what does that look like? Let’s see

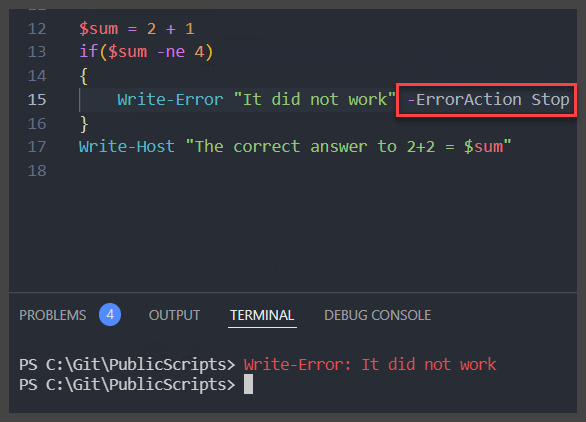
With the -ErrorAction Stop parameter in place, this code now throws a terminating error which can be caught and will also stop the code in its tracks. There are other actions available for the ErrorActon parameter, they are as follows:

  • Continue – This is the default action that throws the error but continues to execute – This is why without any specification of this parameter, we were given the first outcome
  • Ignore – As stated, this throws zero error and just continues executing the code
  • SilentlyContinue – Same as continue, except it throws no visible error, but the error is still recorded
  • Suspend – This is only available in a PowerShell workflow – allows for the workflow to be suspended while the error is investigated
  • Inquire – This will halt the code, and ask the user for input on how to handle the error
Inquire Action

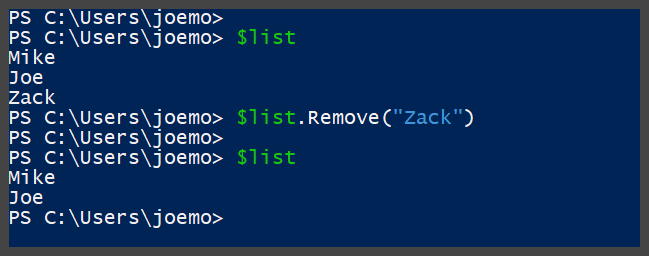
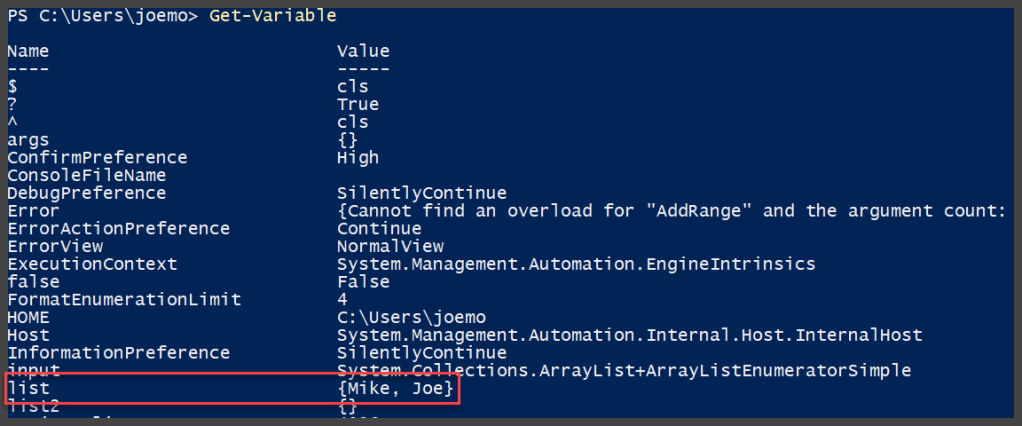
OK great, we have thrown an error, now, what do we do with that error? Do we always want the error to terminate the entire block of code? What if we could remedy the error inside of the code? How do we log what the error was? The good news, all of these are possible. There is a built-in variable in PowerShell $Error which houses all of the errors that have been thrown/generated during the current PowerShell session. I will demonstrate:

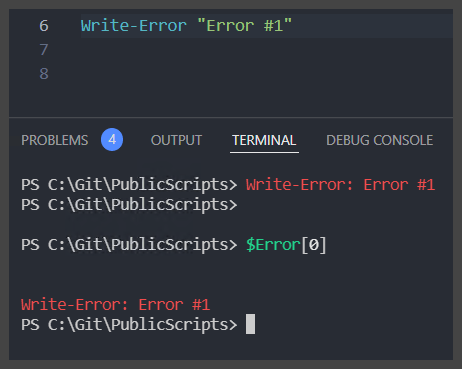
As you can see in the example above – I generated an error with Write-Error, and then the $Error variable, which may look to be an array object, but it is actually a custom PS object called System.Management.Automation.ErrorRecord – if I access the newest record of $Error at [0] – I see the exact same error that I had generated. This is helpful to be able to go back and pull earlier generated errors for logging and tracking purposes. So, now what if we want to be able to handle an error in-line with the code without terminating the entire script, but also being able to modify the outcome as well as log the error? This is where we can utilize the Try-Catch block in PowerShell.

Try-Catch will allow us to throw a terminating error, handle it with custom output or logging, and still be able to continue executing the rest of the script properly. Let’s take a look
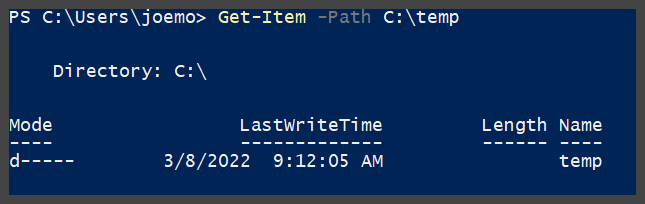
$rgname = "Test RG"
$machines = Get-Content C:\temp\machines.txt 

foreach($item in $machines)
{
    Start-AzVm -ResourceGroupName $rgname -Name $item
}

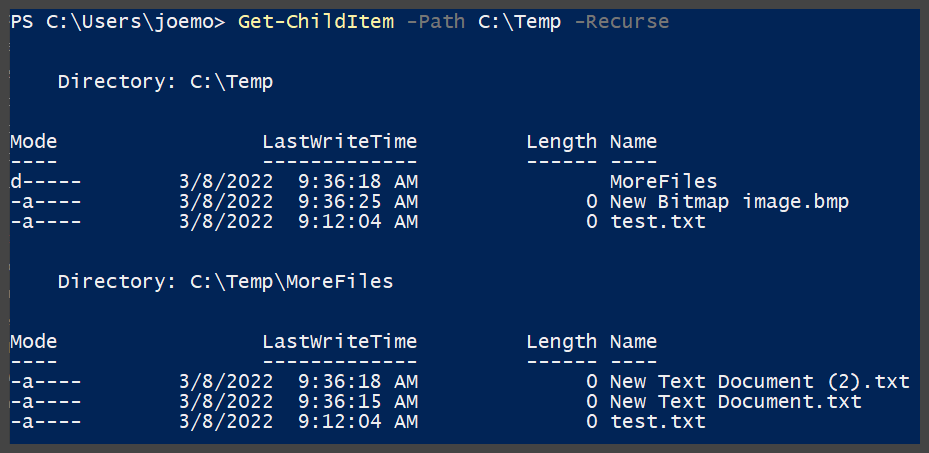
In the above example, we are taking the contents of what we will say is a txt file of Azure Virtual Machine names and we are stepping through those names to start the VMs. Now, if the txt file has some names let’s say that have been deleted or are improperly typed, this is going to cause some issues as the script executes through the array of machines. For each machine that is not named properly in the txt file or is overall just missing or non-existant, it will throw an error to the console that you can view as you run the script (Granted this is not being ran as a PowerShell background job) So technically, you could watch this script as it runs, and you could write down every single machine name as it errors out, and then also copy down the error that is generated so you can investigate all of the machines when it is finished. Does not sound like something I want to be doing while this script runs – why don’t we capture the machine names and the corresponding errors in a variable to deal with later? This sounds a lot more promising. Let’s perform a Try-Catch

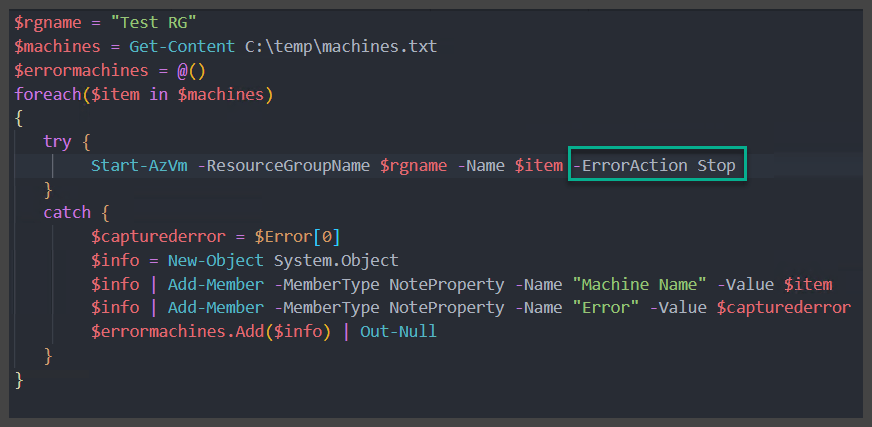
In this example above – We have instituted a Try-Catch block to handle the errors properly. Do not worry if you do not understand everything that is happening, especially in the Catch block – but takeaway from this the fact that the error is now being handled properly. Inside of the Try block, you see that we are simply running the same command as in the first example, except we have also added the -ErrorAction Stop parameter. Now, you are probably saying, wait a minute, that is now a terminating error, doesn’t that now break the execution of the code after the first error? No, it does not, and that is the beauty of the Try block, is that it detects that terminating error, and then throws the error and the code execution down to the Catch block to continue to execute it’s block of code. Now, technically, you could leave the Catch block blank, nothing will happen or be output to the console, and the code will just continue. Honestly, if that is your intent, a simple ErrorAction -SilentlyContinue would achieve the same thing – no what we are looking for here is an action to follow up this error. The code inside of the Catch block is simply assigning a variable to the latest captured error (which in this case would be the error that the Try block captured) and creating a custom PS object to record both the machine name and the corresponding error and then adding those two pieces of data to an array that we created in the beginning of the script. This way, when the script is finished, instead of having a console screen full of errors that you would have needed to jot down or do some weird copy and paste from the console, you now will have a neat array containing the machines and errors that you can easily use to investigate.

You can also utilize more than one Catch in a Try Catch block – especially if you want to be able to capture specific errors and perform different actions on this errors. The following example shows handling a specific error in a try catch block

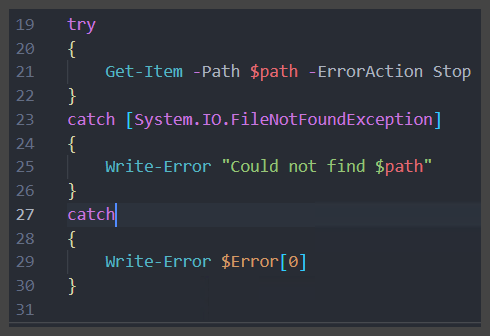
In the above example, we have 2 catch statements, both of which perform different actions, but the first one is looking for a specific error. Multiple catch statements will walk down the statements in order until the error either matches the error it is looking for, or there is a catch-all for the errors. In this case, if there is a specific FileNotFoundException error, this block of code will then output the provided string to the console as an error, and if it is any other type of error, it will simply output the error itself to the console. Specific catch blocks can be useful when you want to handle a specific error in a different way.

These are a couple different ways you can successfully utilize error handling in PowerShell. Just remember, that no matter how small your block of code is, it can always benefit from error handling. Small blocks of code become big blocks in no time, and you will wish you were handling those errors properly from the beginning.

Happy PowerShelling!

Modifying Azure Cosmos Firewall IpRules with PowerShell

When deploying a Cosmos DB account to Azure, one of the security steps you definitely want to take is enabling the firewall to prevent unauthorized traffic from accessing your Cosmos resource. However, if you have spent any time in Azure, you would also understand that this can cause some issues with resources or developers accessing the Cosmos resource. This is where adding IP rules can come into play, and what is the easiest way to modify Azure resources? That’s right! PowerShell!

Now, when you first create a Cosmos DB – especially if it is being done through the Portal wizard, it is likely that you will have the firewall turned off. as shown below.

The All Networks selection means the firewall is turned off and that this Cosmos DB can be accessed from anywhere. This is a security no-no and the proper selection is to turn on Selected networks.

This selection locks down your Cosmos DB and only allows traffic from the VNets or IPs you specify. There is also a yellow highlighted section above that you may want to pay attention to as well, and that is being able to access Cosmos DB from the Azure portal. Now, this can sometimes lead to confusion, because as you would see, even if this is not selected, you can still access the Cosmos DB resource – that is because, this is for the “Data” layer, and not the “Management” layer. This selection allows you to access what is known as “Data Explorer” from the Azure portal itself. There is a reason I bring this up and define it, I promise

OK, so by now you are going, “Joe, I believe you said something about PowerShell in the title?” “I am trying to modify multiple Cosmos DB resources at once, or I am always adding the same IP ranges to my Cosmos DBs and I want to be able to do it programmatically” You’re right, let’s get to it

OK, so what CMDlets allow you to access and update a Cosmos DB? Well, the first thing you are going to need is the Az.CosmosDB Module (Here is the link directly to the Module itself if you care to read up on it https://docs.microsoft.com/en-us/powershell/module/az.cosmosdb/?view=azps-7.3.2)

Once you have your Az.CosmosDB or even the whole Az module installed, we can get going. First off, let’s take a look at querying our Cosmos DB above and see what IP Rules are currently on this resource.

PS C:\Users\joemo> Get-AzCosmosDBAccount -ResourceGroupName Morley-RG -Name cosmosblogtest


Id                                 : /subscriptions/bb1fa4b4-6836-4bc4-afcb-b7c46769a09b/resourceGroups/Morley-RG/providers/Microsoft.DocumentDB/databaseAccounts/cosmosblogtest
Name                               : cosmosblogtest
Location                           : East US 2
Tags                               : {[defaultExperience, Core (SQL)], [hidden-cosmos-mmspecial, ]}
EnableCassandraConnector           : 
EnableMultipleWriteLocations       : False
VirtualNetworkRules                : {}
FailoverPolicies                   : {cosmosblogtest-eastus2}
Locations                          : {cosmosblogtest-eastus2}
ReadLocations                      : {cosmosblogtest-eastus2}
WriteLocations                     : {cosmosblogtest-eastus2}
Capabilities                       : {EnableServerless}
ConsistencyPolicy                  : Microsoft.Azure.Management.CosmosDB.Models.ConsistencyPolicy
EnableAutomaticFailover            : False
IsVirtualNetworkFilterEnabled      : False
IpRules                            : {Microsoft.Azure.Management.CosmosDB.Models.IpAddressOrRange, Microsoft.Azure.Management.CosmosDB.Models.IpAddressOrRange, Microsoft.Azure.Management.CosmosDB.Models.IpAddressOrRange, Microsoft.Azure.Management.CosmosDB.Models.IpAddressOrRange…}
DatabaseAccountOfferType           : Standard
DocumentEndpoint                   : https://cosmosblogtest.documents.azure.com:443/
ProvisioningState                  : Succeeded
Kind                               : GlobalDocumentDB
ConnectorOffer                     : 
DisableKeyBasedMetadataWriteAccess : False
PublicNetworkAccess                : Enabled
KeyVaultKeyUri                     : 
PrivateEndpointConnections         : 
EnableFreeTier                     : False
ApiProperties                      : Microsoft.Azure.Commands.CosmosDB.Models.PSApiProperties
EnableAnalyticalStorage            : False
NetworkAclBypass                   : None
NetworkAclBypassResourceIds        : {}
InstanceId                         : 9514bccd-dbf0-4196-b63b-16568d6668a1
BackupPolicy                       : Microsoft.Azure.Commands.CosmosDB.Models.PSBackupPolicy
RestoreParameters                  : Microsoft.Azure.Commands.CosmosDB.Models.PSRestoreParameters
CreateMode                         : 
AnalyticalStorageConfiguration     : Microsoft.Azure.Commands.CosmosDB.Models.PSAnalyticalStorageConfiguration

Now, if you look at the code results above, you will see that I utilized the following CMDlet to access the properties of the CosmosDB

Get-AzCosmosDBAccount -ResourceGroupName Morley-RG -Name cosmosblogtest

If you look at the results of this command, you will see highlighted in green, a property called IpRules that is actually an IList property type (This simply means it is a generic list property that can be accessed through an index like an array). This property holds inside of it, the IP Rules currently instilled on this firewall. If we look a little deeper, we can see “which” IPRules they actually are.

Get-AzCosmosDBAccount -ResourceGroupName Morley-RG -Name cosmosblogtest | Select-Object -ExpandProperty IpRules


IpAddressOrRangeProperty
------------------------
1.1.1.1
104.42.195.92
40.76.54.131
52.176.6.30
52.169.50.45
52.187.184.26

See above, by expanding the IpRules property, we are able to see the IP Rules currently sitting on the firewall. If we compare it to the portal, it looks a little different.

As you see above, when comparing the two outputs, it appears that the only matching IP is 1.1.1.1 – the other IPs listed in the PowerShell property do not “exist” in the portal. Well, remember when I pointed out the checkbox for Allow access from Azure Portal? This is where this comes into play. If you check the following excerpt from Microsoft documentation, you will see that those other 5 IPs are actually attached to the Azure Portal backend, and are the result of that single checkbox

Article Link – Configure an IP firewall for your Azure Cosmos DB account | Microsoft Docs

Why does this matter, well, let’s look at adding an additional IP range to the firewall and find out shall we? To achieve this, we are going to utilize the Update-AzCosmosDBAccount CMDlet

Update-AzCosmosDBAccount -ResourceGroupName Morley-RG -Name cosmosblogtest -IpRule "2.2.2.2"

You would expect that the above line of code would add IP 2.2.2.2 to the IpRules for the Cosmos DB – well, technically, it does- but unfortunately as shown below

Get-AzCosmosDBAccount -ResourceGroupName Morley-RG -Name cosmosblogtest | Select-Object -ExpandProperty IpRules


IpAddressOrRangeProperty
------------------------
2.2.2.2

It “replaces” the IpRules with the new rule you have provided, and worse yet, look what it does for portal access…

The IPs for the Azure Backend have been removed, so now you also have zero access to Data Explorer from the portal. How do we fix this? Well, we need to make sure we are adding back in what is there. The following code is a function that accepts a string array of IPs to be added, as well as the ResourceGroupName and name of the Cosmos DB, and also make sure to pull all of the current IPs and IP ranges, so that everything is added back to the firewall. Let’s take a look.

function Add-CosmosIPRules 
{
    [CmdletBinding()]
    param (
        [Parameter()]
        [string]
        $resourceGroupName,
        [string]
        $cosmosDBName,
        [string[]]
        $ipRules
    )
    #pull current rules
    $currentrules = Get-AzCosmosDBAccount -ResourceGroupName $rgName 
    -Name $cosmosName | Select-Object -ExpandProperty IpRules

    #add current rules to new iprules array
    foreach($rule in $currentrules.IpAddressOrRangeProperty)
    {
        $iprules += $rule
    }

    #update cosmos iprules
    Update-AzCosmosDBAccount -ResourceGroupName $rgName -Name $cosmosName `
    -IpRule $iprules -AsJob
}

This is not a PowerShell function post, so I am not going to go too deep into what is happening in this function, but we are setting a variable to the expanded property of IpRules from the provided Cosmos DB, and then we are stepping through that same variable and adding each index of the variable to the provided ipRules string array that was provided to the function through the parameter. This ipRules variable is then utilized in the Update-AzCosmosDBAccount CMDlet to modify the firewall.

Now, let’s see what results when we run this function – populating all of the information for our current Cosmos DB, including adding back the IPs for Portal Access, as well as our original 1.1.1.1 IP address.

Add-CosmosIPRules -resourceGroupName Morley-RG -cosmosDBName cosmosblogtest -ipRules ('1.1.1.1','104.42.195.92','40.76.54.131','52.176.6.30','52.169.50.45','52.187.184.26')

Now let’s check the outcome of running the function

Get-AzCosmosDBAccount -ResourceGroupName Morley-RG -Name cosmosblogtest | Select-Object -ExpandProperty IpRules                                                                                                                      


IpAddressOrRangeProperty
------------------------ 
1.1.1.1
104.42.195.92
40.76.54.131
52.176.6.30
52.169.50.45
52.187.184.26
2.2.2.2

Success! We were able to add the IPs into the firewall, but also retain the 2.2.2.2 address that was already on the firewall. In addition, if we look now at the portal

We can see that our access from the Azure Portal is now enabled. So, we were able to update the Cosmos DB firewall IP rules properly.

Now that’s Powerzure!

PowerShell… Variables… Store that data

Why Variables?

In order to retrieve all of the processes currently running on your computer with PowerShell, you simply need to utilize the following CMDlet

Get-Process

This will give you the following output

Sample of data from Get-Process

We could say, cool, this shows me all of the processes that are currently running, and some of their important properties. Which is nice, it is, if we wanted to look at this data in real-time, right away, and not need it for any additional purpose. Unfortunately, that is usually not the case when it comes to data in PowerShell, or any language for that matter. Let’s pretend we were running this scriptblock on a remote server (You can learn this in a more advanced post) and we wanted to pull back those processes so we could send them to a support analyst to troubleshoot a performance issue? Hmmm, where would we be able to put that data? I know! A variable! Which is nothing more than a logical piece of memory that holds data.

Variables in PowerShell

PowerShell is no different than any other language in that it uses variables to store data. A variable in PowerShell is easy to spot as it is always preceded by a $ sign.

$myname = "Joe"

This probably seems like a simple line of PowerShell code – I mean it is only 15 characters, and is a simple equation statement, however, it is performing three actions at the same exact time. It is creating a variable named “myname”, it is storing it as a string value in memory, and it is assigning the value of “Joe” to the variable. This is a simplistic example of how to create a variable in PowerShell. If we look at this example a little closer you will see what I mean

Creating a string variable

As you can see above, the variable has a value of “Joe” and is a string type variable. This variable can then be used in another command if needed and pass along this stored data. For example, let’s say we wanted to write out the name it stores. We could easily do the following

Write-Host $myname

This will write the output as shown below

Result of Write-Host $myname

The variable has allowed this command to write the data stored in the $myname variable without modifying the command line. Therefore, if we simply modify the variable, this command will produce different results.

Data Types in PowerShell

When declaring or utilizing variables, it is important to understand the data type that is being used with the variable. In the above example, the variable was declared and initialized as a string datatype because it was given a string value when it was created. If we wanted to utilize a number let’s say for the variable, then we would have a couple different datatypes to utilize. Two of which are the most common are Int32 and Double. Let’s look at an example

PS C:\Users\joemo> $mynumber = 1
PS C:\Users\joemo> $mynumber.GetType()

IsPublic IsSerial Name                                     BaseType
-------- -------- ----                                     --------
True     True     Int32                                    System.ValueType


PS C:\Users\joemo>
PS C:\Users\joemo> $mynumber = 1.3
PS C:\Users\joemo> $mynumber.GetType()

IsPublic IsSerial Name                                     BaseType
-------- -------- ----                                     --------
True     True     Double                                   System.ValueType

As you can see above – setting $mynumber simply to 1 is an Int32 data type – while setting the same variable to a number with a decimal, such as 1.3 utilizes the Double data type. Let’s look at another data type, which is datetime. As you can most likely guess, this is for storing a date, time, or a combination of both in a variable. However, unlike the Int32, string, or Double data types that we have already looked at, the datetime data type is a little different in how you declare it.

If you look at this simple example, you will see it does not pick up the datetime data type as might be expected

Well, that did not work as expected – it accepted the value of “03-03-2022” but it set the data type of the variable as a string. Perhaps if we add the time in with the date it will assign the proper data type?

Hmmm, that did not work either – perhaps this needs to be a different way? Yes, it does – because technically what PowerShell thinks I am passing the variable here is a string value. It is going to pick up that first before it decides to think of that string value as a datetime data type. However, we can help it a bit by casting the variable as a datetime data type as we are declaring it.

There we go! By casting the PowerShell variable type as we are declaring it, it allowed PowerShell to pick up on the format of the string and accept it as a datetime data type. Now, you may be thinking, what does it matter? Both versions of the variable are going to spit out the same output. Well, not exactly, let’s look at that and why data types are so important.

That is not the result we were looking for when we were trying to increase the date of the variable by 2 days. Why? Because PowerShell thinks that value is a string, and well, let’s not be silly, you cannot add 2 days to a string. What happens if we try it as a declared datetime data type.

Now that looks better! Not only does the output of the variable properly represent a date and time, but the datetime data type allows PowerShell to understand that it now contains a method (deeper into this in another post) of AddDays which allows us to simply add 2 days to the variable if needed. This highlights why it is important to make sure your data types are right when you are dealing with variables. This would also prove important if you were trying to sort variables, and especially important if you were delivering data into a structured database such as SQL.

Variable Arrays and ArrayLists

OK, so you now know how to store some data in a variable. Let’s say you were writing a PowerShell script that is going to capture the names of everyone in a department at your company. You know understand that if you want to store that data in the script and utilize it as output, or want to send it to another source from the script, you will need a variable. However, can I store more than one item in a variable? Let’s see if that works.

Did that work? It seems that the variable is holding all four names right? What if we wanted to modify the list, or if we wanted to perform an action on each name in the variable? Would that work? No, it would not because the “names” the variable is holding are unfortunately stored as 1 string variable. How can we tell? Almost every variable holds a method known as count, which tells us how many “objects” it holds. Let’s try

The variable shows 1 object, but how can that be? We gave it four names…no, we didn’t, we gave it one string object. So, how do we house all four names in a variable? We can do that in what is known as an array. Let’s look at how we do that and how it is different.

Well, that certainly looks better right? The names variable now shows that it does indeed house 4 objects. The objects also, if you notice, are written out in 4 separate lines when we output the values. This is because this variable is now an array.

Now that we have an array, we can treat these 4 names as independent objects and not one big string object. With an array, you can sort the objects, you can even step through and utilize each object in a separate command. Let’s look at how some of these are performed on an array.

Now, in the above example, I have used some techniques that are a little more advanced, so please disregard worrying about those for now, but the most important thing to understand is we were able to utilize each name in the array as a separate object. So, the next obvious question you most likely have is, cool Joe, I see how you can do these actions with an array, but what happens when I want to add or remove objects in an array? Well, let’s give it a try.

That did not go well, seems that even though an array has an Add and Remove method, we cannot modify the array because it is a “fixed” size. Thus, the limitation of the array, and usually where PowerShell beginners start scratching their heads and head off to Google to find out what is going on. Now, speaking from an advanced standpoint, you CAN actually create a large array that you can then begin to fill up as needed, but this is not a recommended way of utilizing an array variable, plus it will take a larger amount of memory to store this placeholder array. This is where we look at what is known as an ArrayList.

So, an ArrayList you are thinking, no how do I make one of those? It’s almost as simple as making an array honestly., with just a simple modification. Let’s take a look at a couple ways to create an ArrayList.

Creating an ArrayList

In the examples above, I have shown you the two ways to create an ArrayList. Now, as stated before, an ArrayList has a lot of the same properties and methods as an Array, but unlike an array, it is not a fixed size and can be modified on the fly. Here is an example of adding, removing, and sorting an ArrayList.

Adding to an ArrayList

Sorting an ArrayList

Removing from an ArrayList

As you can see from the examples above, an ArrayList is a lot more pliable when you are not sure how many objects you are going to need in your variable, or if you are going to need to remove any objects at a later date.

Checking out all the Variables…

If you create a variable and even if you do not assign any values or data to that variable, it is stored in that current session of PowerShell. To see all of your variables, there is a simple CMDlet called

Get-Variable

Now, as you can see, there are a lot more variables than I have created in this post/session – and most of these are the System variables that are created and updated as you are utilizing your PowerShell session. Variables such as HOME, which is the home directory for your PowerShell sessions, and then there is a dynamic variable such as Error – which houses all the errors that are encountered during your current PowerShell session. You can see in the highlighted box, that it also contains our ArrayList variable list, which as you can see contains our two names. There is also the ability to change a variable (Which can be also by just assigning it a new value with an equation statement such as $a = 5), clear the value completely for a variable without deleting it, and Remove variables with the following CMDlets.

Set-Variable / Clear-Variable / Remove-Variable

In addition, you can also output a variable by just typing the variable out such as

PS C:\Users\joemo> $a = 5
PS C:\Users\joemo> $a
5
PS C:\Users\joemo>

Or by using a multitude of different output methods such as exporting to a file, generating the data in a table, or even exporting the data into an HTML file.

Conclusion

I hope I have cleared up any confusion or questions you had regarding utilizing variables in PowerShell. This is more a simplistic view on the PowerShell variable as I plan to post a more advanced techniques post on PowerShell variables at a later date!

In the meantime – Happy PowerShelling!

PowerShell…Work faster and smarter….not harder…

“How do I learn PowerShell?”

PowerShell has yet to prove me wrong when I tell someone, “I can do that faster and more efficiently with PowerShell.” I first started with PowerShell back in my end-user administration days, and it did not take me long to understand that I could do 10x the work if I utilized PowerShell efficiently. Now, the age-old question I get from my peers and friends in the industry is… “How do I learn PowerShell?” Honestly, this is a difficult question to answer, because just with a lot of other subjects and technologies in IT/Tech, it is all about doing it to become better at it. Yes, there are many books out there that teach PowerShell, and please do not dismiss them, they are very good and have a lot of great information in them. However, if you read the first couple pages of most any PowerShell book – it will undoubtedly tell you, that the best way to learn PowerShell is by “doing”.

“Got it, I need to DO PowerShell, but where do I start?”

So, you have your cup of coffee, your book you bought, and now you are ready to DO PowerShell. You log in to your computer, you open a run box, you type in “Powershell” and hit enter. This will greet you with a dark blue command window that looks sort of like this

Now What?

Well, come on, DO some PowerShell… Yeah, it’s not that easy – I mean, forget actually writing a line of PowerShell – what SHOULD I do with it? This is where utilizing it in your everyday administration and operation comes into play. The next question from everyone is – “Where did you start?” I started by not wanting to repeat tasks over and over again. Plain and simple… Are you going to bring up PowerShell to copy one file from one folder to another? I’m not – because by the time I type out the paths of both files (or copy path from explorer context) I could have dragged and dropped the file. It is important to use PowerShell for something you are actually trying to accomplish, I find this the best way to make sure you see your lesson all the way through.

“Just show me some PowerShell already!”

Alright, let’s DO some Powershell, but first, let’s understand how the basics work in PowerShell syntax. In PowerShell, you utilize what is known as a CMDlet to perform an action or task. If you use any of the built-in or community-built CMDlets you will notice that they are more times than not, a [Verb-Noun] such as “Get-Item” or “Add-Disk”. The syntax is NOT case-sensitive and the arguments for the CMDlets are known as “parameters”.

Let’s take this example:

Get-Item -Path C:\Temp

This will simply pull back the directory properties for the C:\Temp folder. To see what this actually looks like in PowerShell, see below

Results of Get-Item -Path C:\Temp

This is a simple example of Verb-Noun CMDlet using a parameter and performing a command to retrieve data. Now, you are reading this and going “Who cares about the information of that specific folder…what about the files in it? Funny you should mention that because there is an additional CMDlet named Get-ChildItem which will show you exactly that information. Let’s take a look

Get-ChildItem -Path C:\Temp

This CMDlet will actually show us the files and/or folders that are actually inside of the C:\Temp folder. This in my opinion is more times than not more useful than a simple Get-Item command. The results are below

Results of Get-ChildItem -Path C:\Temp\

Now, as you can see from the graphic results above, this folder has a text file in it, as well as a bitmap file and also a nested directory. Now, what if I wanted to include the contents of the nested folder too? This is where additional parameters come in – technically, we have already used a parameter which is the -Path parameter for telling us which folder to pull our data, however, CMDlets have multiple parameters that allow you to fine-tune the data you are pulling. Let’s try the -recurse parameter.

Get-ChildItem -Path C:\Temp -Recurse

This command line will not only pull the contents of the folder, but also all of the files/folders that are nested in folders underneath the path root folder. See Below

Results of Get-ChildItem -Path C:\Temp -Recurse

As you can see above, it does pull those additional files/folders that are nested under the path root. This is just a simple example of utilizing more than one parameter for a CMDlet to fine-tune down your results.

There are thousands of CMDlets and even more parameters attached to those CMDlets, so the possibilities of what you can do in PowerShell are almost endless – especially since new CMDlets and functions (discussed in another post) are being created every day with all the new technologies that get released. So, get some coffee, get yourself a PowerShell book (Or better yet, send me some topics and read my posts), and start performing your everyday tasks in PowerShell, and before you know it, you’ll know it!