When deploying a Cosmos DB account to Azure, one of the security steps you definitely want to take is enabling the firewall to prevent unauthorized traffic from accessing your Cosmos resource. However, if you have spent any time in Azure, you would also understand that this can cause some issues with resources or developers accessing the Cosmos resource. This is where adding IP rules can come into play, and what is the easiest way to modify Azure resources? That’s right! PowerShell!
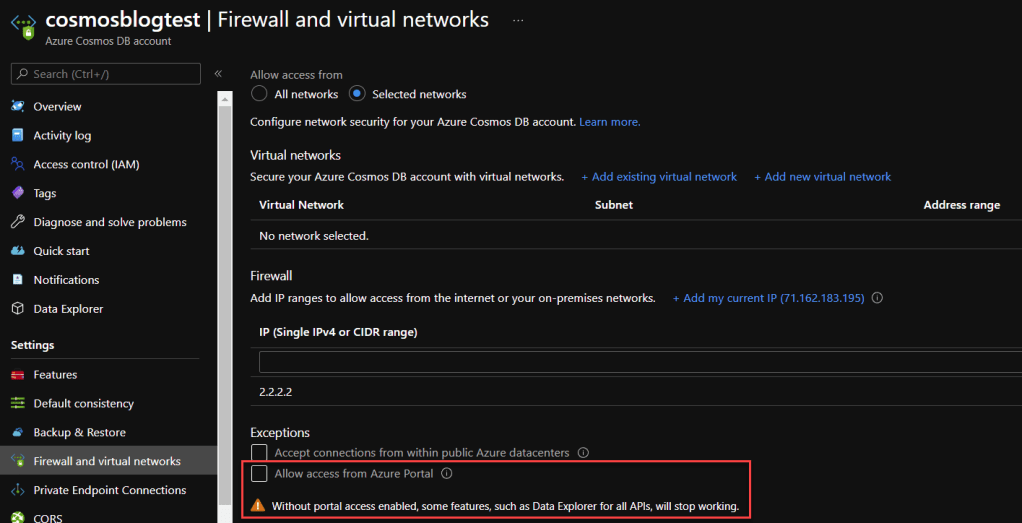
Now, when you first create a Cosmos DB – especially if it is being done through the Portal wizard, it is likely that you will have the firewall turned off. as shown below.
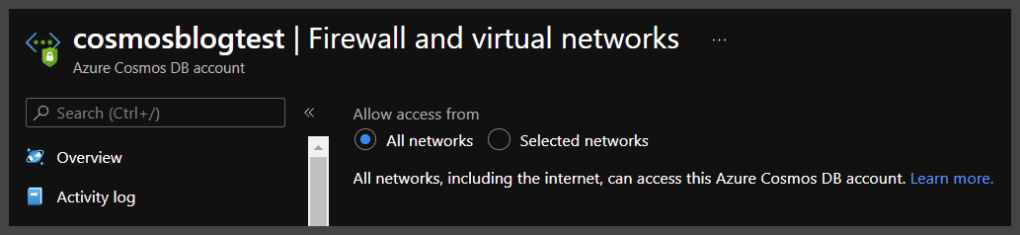
The All Networks selection means the firewall is turned off and that this Cosmos DB can be accessed from anywhere. This is a security no-no and the proper selection is to turn on Selected networks.
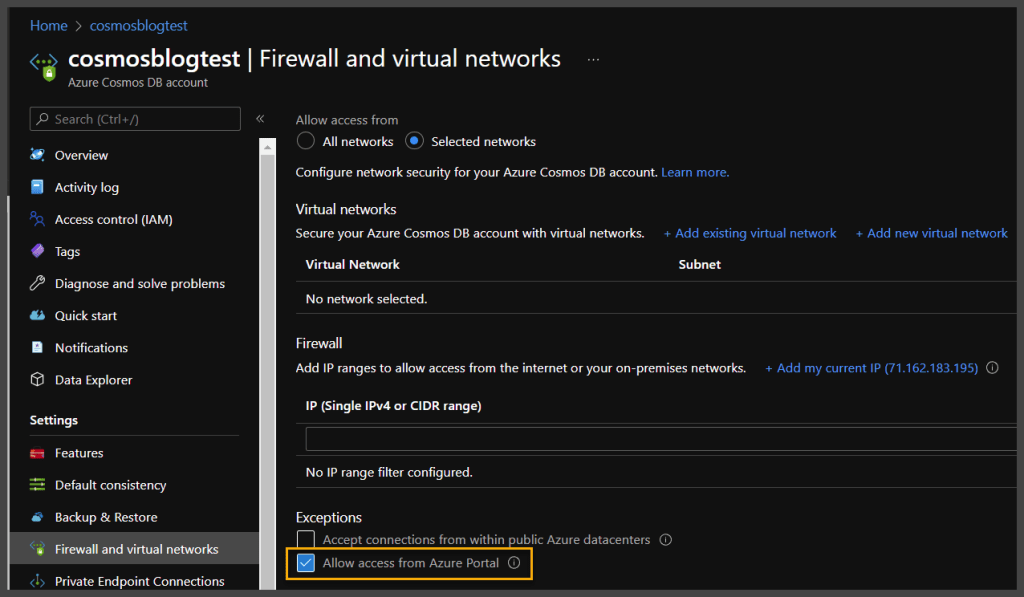
This selection locks down your Cosmos DB and only allows traffic from the VNets or IPs you specify. There is also a yellow highlighted section above that you may want to pay attention to as well, and that is being able to access Cosmos DB from the Azure portal. Now, this can sometimes lead to confusion, because as you would see, even if this is not selected, you can still access the Cosmos DB resource – that is because, this is for the “Data” layer, and not the “Management” layer. This selection allows you to access what is known as “Data Explorer” from the Azure portal itself. There is a reason I bring this up and define it, I promise
OK, so by now you are going, “Joe, I believe you said something about PowerShell in the title?” “I am trying to modify multiple Cosmos DB resources at once, or I am always adding the same IP ranges to my Cosmos DBs and I want to be able to do it programmatically” You’re right, let’s get to it
OK, so what CMDlets allow you to access and update a Cosmos DB? Well, the first thing you are going to need is the Az.CosmosDB Module (Here is the link directly to the Module itself if you care to read up on it https://docs.microsoft.com/en-us/powershell/module/az.cosmosdb/?view=azps-7.3.2)
Once you have your Az.CosmosDB or even the whole Az module installed, we can get going. First off, let’s take a look at querying our Cosmos DB above and see what IP Rules are currently on this resource.
PS C:\Users\joemo> Get-AzCosmosDBAccount -ResourceGroupName Morley-RG -Name cosmosblogtest


Id                                 : /subscriptions/bb1fa4b4-6836-4bc4-afcb-b7c46769a09b/resourceGroups/Morley-RG/providers/Microsoft.DocumentDB/databaseAccounts/cosmosblogtest
Name                               : cosmosblogtest
Location                           : East US 2
Tags                               : {[defaultExperience, Core (SQL)], [hidden-cosmos-mmspecial, ]}
EnableCassandraConnector           :
EnableMultipleWriteLocations       : False
VirtualNetworkRules                : {}
FailoverPolicies                   : {cosmosblogtest-eastus2}
Locations                          : {cosmosblogtest-eastus2}
ReadLocations                      : {cosmosblogtest-eastus2}
WriteLocations                     : {cosmosblogtest-eastus2}
Capabilities                       : {EnableServerless}
ConsistencyPolicy                  : Microsoft.Azure.Management.CosmosDB.Models.ConsistencyPolicy
EnableAutomaticFailover            : False
IsVirtualNetworkFilterEnabled      : False
IpRules                            : {Microsoft.Azure.Management.CosmosDB.Models.IpAddressOrRange, Microsoft.Azure.Management.CosmosDB.Models.IpAddressOrRange, Microsoft.Azure.Management.CosmosDB.Models.IpAddressOrRange, Microsoft.Azure.Management.CosmosDB.Models.IpAddressOrRange…}
DatabaseAccountOfferType           : Standard
DocumentEndpoint                   : https://cosmosblogtest.documents.azure.com:443/
ProvisioningState                  : Succeeded
Kind                               : GlobalDocumentDB
ConnectorOffer                     :
DisableKeyBasedMetadataWriteAccess : False
PublicNetworkAccess                : Enabled
KeyVaultKeyUri                     :
PrivateEndpointConnections         :
EnableFreeTier                     : False
ApiProperties                      : Microsoft.Azure.Commands.CosmosDB.Models.PSApiProperties
EnableAnalyticalStorage            : False
NetworkAclBypass                   : None
NetworkAclBypassResourceIds        : {}
InstanceId                         : 9514bccd-dbf0-4196-b63b-16568d6668a1
BackupPolicy                       : Microsoft.Azure.Commands.CosmosDB.Models.PSBackupPolicy
RestoreParameters                  : Microsoft.Azure.Commands.CosmosDB.Models.PSRestoreParameters
CreateMode                         :
AnalyticalStorageConfiguration     : Microsoft.Azure.Commands.CosmosDB.Models.PSAnalyticalStorageConfiguration
Now, if you look at the code results above, you will see that I utilized the following CMDlet to access the properties of the CosmosDB
Get-AzCosmosDBAccount -ResourceGroupName Morley-RG -Name cosmosblogtest
If you look at the results of this command, you will see highlighted in green, a property called IpRules that is actually an IList property type (This simply means it is a generic list property that can be accessed through an index like an array). This property holds inside of it, the IP Rules currently instilled on this firewall. If we look a little deeper, we can see “which” IPRules they actually are.
Get-AzCosmosDBAccount -ResourceGroupName Morley-RG -Name cosmosblogtest | Select-Object -ExpandProperty IpRules


IpAddressOrRangeProperty
------------------------
1.1.1.1
104.42.195.92
40.76.54.131
52.176.6.30
52.169.50.45
52.187.184.26
See above, by expanding the IpRules property, we are able to see the IP Rules currently sitting on the firewall. If we compare it to the portal, it looks a little different.
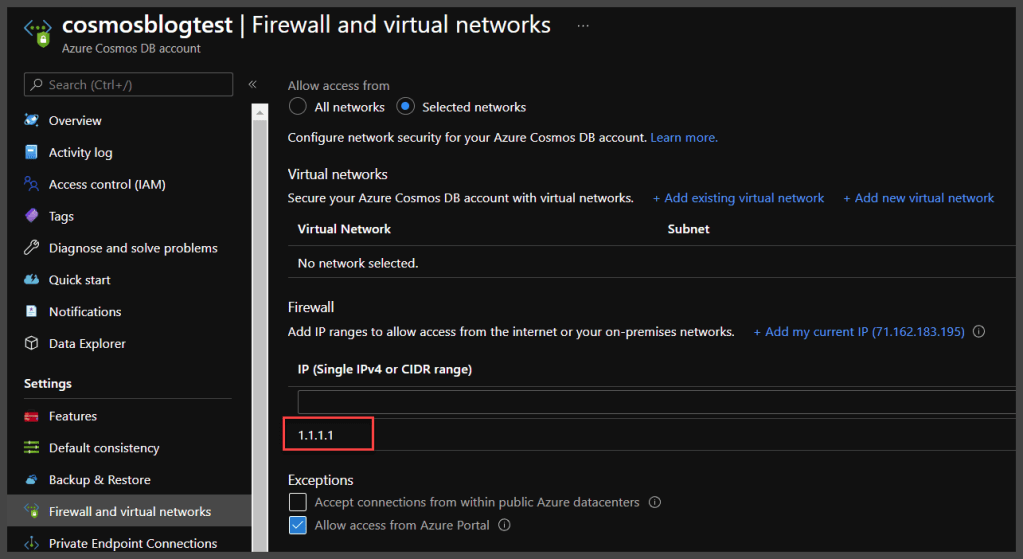
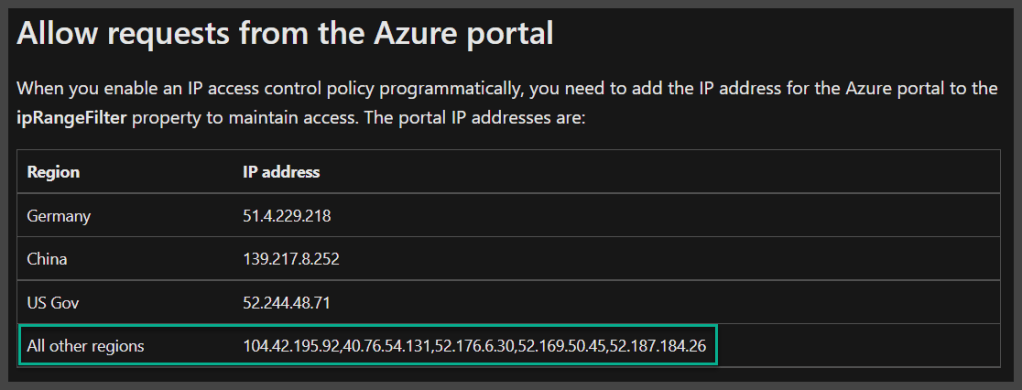
As you see above, when comparing the two outputs, it appears that the only matching IP is 1.1.1.1 – the other IPs listed in the PowerShell property do not “exist” in the portal. Well, remember when I pointed out the checkbox for Allow access from Azure Portal? This is where this comes into play. If you check the following excerpt from Microsoft documentation, you will see that those other 5 IPs are actually attached to the Azure Portal backend, and are the result of that single checkbox
Article Link – Configure an IP firewall for your Azure Cosmos DB account | Microsoft Docs
Why does this matter, well, let’s look at adding an additional IP range to the firewall and find out shall we? To achieve this, we are going to utilize the Update-AzCosmosDBAccount CMDlet
Update-AzCosmosDBAccount -ResourceGroupName Morley-RG -Name cosmosblogtest -IpRule "2.2.2.2"
You would expect that the above line of code would add IP 2.2.2.2 to the IpRules for the Cosmos DB – well, technically, it does- but unfortunately as shown below
Get-AzCosmosDBAccount -ResourceGroupName Morley-RG -Name cosmosblogtest | Select-Object -ExpandProperty IpRules


IpAddressOrRangeProperty
------------------------
2.2.2.2
It “replaces” the IpRules with the new rule you have provided, and worse yet, look what it does for portal access…
The IPs for the Azure Backend have been removed, so now you also have zero access to Data Explorer from the portal. How do we fix this? Well, we need to make sure we are adding back in what is there. The following code is a function that accepts a string array of IPs to be added, as well as the ResourceGroupName and name of the Cosmos DB, and also make sure to pull all of the current IPs and IP ranges, so that everything is added back to the firewall. Let’s take a look.
function Add-CosmosIPRules
{
    [CmdletBinding()]
    param (
        [Parameter()]
        [string]
        $resourceGroupName,
        [string]
        $cosmosDBName,
        [string[]]
        $ipRules
    )
    #pull current rules
    $currentrules = Get-AzCosmosDBAccount -ResourceGroupName $rgName
    -Name $cosmosName | Select-Object -ExpandProperty IpRules

    #add current rules to new iprules array
    foreach($rule in $currentrules.IpAddressOrRangeProperty)
    {
        $iprules += $rule
    }

    #update cosmos iprules
    Update-AzCosmosDBAccount -ResourceGroupName $rgName -Name $cosmosName `
    -IpRule $iprules -AsJob
}
This is not a PowerShell function post, so I am not going to go too deep into what is happening in this function, but we are setting a variable to the expanded property of IpRules from the provided Cosmos DB, and then we are stepping through that same variable and adding each index of the variable to the provided ipRules string array that was provided to the function through the parameter. This ipRules variable is then utilized in the Update-AzCosmosDBAccount CMDlet to modify the firewall.
Now, let’s see what results when we run this function – populating all of the information for our current Cosmos DB, including adding back the IPs for Portal Access, as well as our original 1.1.1.1 IP address.
Add-CosmosIPRules -resourceGroupName Morley-RG -cosmosDBName cosmosblogtest -ipRules ('1.1.1.1','104.42.195.92','40.76.54.131','52.176.6.30','52.169.50.45','52.187.184.26')
Now let’s check the outcome of running the function
Get-AzCosmosDBAccount -ResourceGroupName Morley-RG -Name cosmosblogtest | Select-Object -ExpandProperty IpRules


IpAddressOrRangeProperty
------------------------
1.1.1.1
104.42.195.92
40.76.54.131
52.176.6.30
52.169.50.45
52.187.184.26
2.2.2.2
Success! We were able to add the IPs into the firewall, but also retain the 2.2.2.2 address that was already on the firewall. In addition, if we look now at the portal
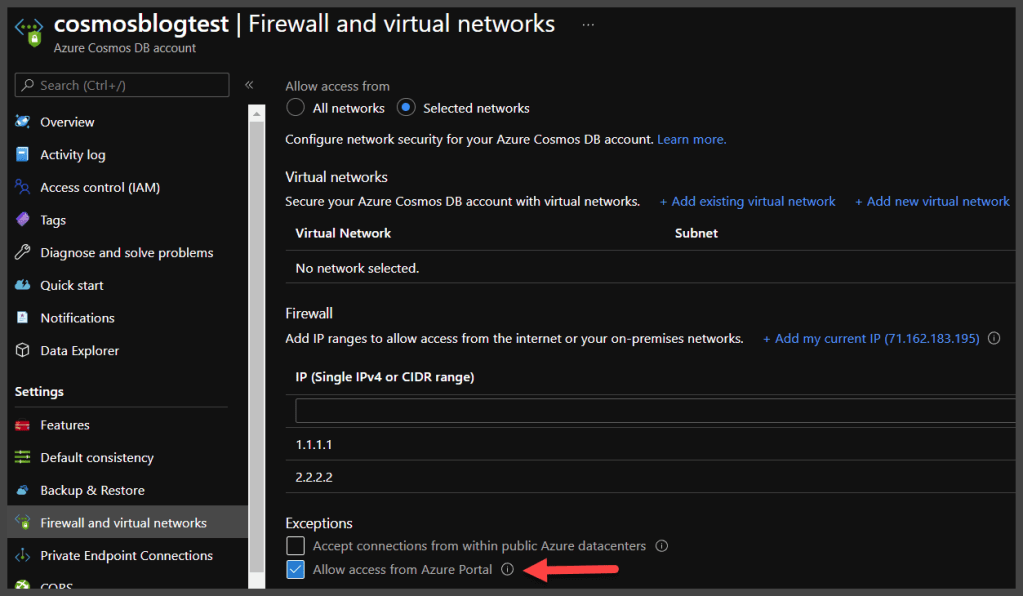
We can see that our access from the Azure Portal is now enabled. So, we were able to update the Cosmos DB firewall IP rules properly.
Now that’s Powerzure!
